Amazon Web Services for Data Science
Amazon Web Services (AWS)1 provides a low-cost, scalable and highly reliable infrastructure platform in a secure cloud, and offers services like database storage, security, networking, computing, mobile development functionalities, on pay as you use basis.
AWS home page
In a traditional system, a server has to set up and maintain, which is not consumed most of its life cycle and a huge amount and resources are wasted. This problem is solved by AWS, by giving the opportunity to bring the servers online and offline whenever required.
Thousands of companies like Quora, Dropbox, Reddit etc are using Amazon web services, as it helps them to focus on their business and relieves the pain of setting and maintaining servers which reduce the costs effectively.
Out of all the services provided by Amazon, you will learn all about Amazon EC2.
Amazon EC2
Amazon Elastic Compute Cloud(Amazon EC2), as explained on the official website2, provides scalable computing capacity in the Amazon Web Services (AWS) cloud, which eliminates your need to invest in hardware and help to develop and deploy applications faster.
It can be used to launch many or a few virtual servers as you need, configure security and networking, and manage storage. Amazon EC2 also enables you to scale up or down as per the requirements or spikes in popularity, reducing your need to forecast traffic.
All the features of Amazon EC2 can be found here.
AWS Free Tier
AWS provides AWS Free Tier to run an EC2 micro instance free of cost for 12 months, which is a very good start for a developer for trying and getting accustomed to AWS.
AWS Free Tier
Go to AWS Free Tier website to sign up for all the services in AWS, including Amazon EC2.
How to create an instance in an Amazon Web Services (AWS)?
How to connect to an instance of Amazon Web Services(AWS)
In order to make an instance in an Amazon web service, follow the following steps:
- Open the browser and go to the amazon web service and sign in with your credentials.
- From AWS dashboard, select EC2 or click on Services and select EC2 to open the Amazon EC2 console.
- Click on blue button Launch instances.
-
- Choose an Amazon Machine Image (AMI)
- Select Ubuntu Server 18.04 LTS (HVM), SSD Volume Type - ami-0f65671a86f061fcd (64-bit x86) / ami-0f2057f28f0a44d06 (64-bit Arm) and click on Select.
-
- Choose an Instance Type
- Select General purpose t2.micro Free tier eligible and click on Configure Instance Details.
-
- Configure Instance Details
- Configure the instance according to your requirements and click on Next Add Storage.
-
- Add Storage
- By default is 8 GB size but we will change it to 20 GB and click on Review and Launch.
It will take us to step 7: Review Instance Launch and click on Launch.
-
-
A pop will come which will ask to
Select an existing key pair or create a new key pair. ChoseCreate a new key pairand give a Key pair namemy_key_pairand download the file. - Click on Launch the instances.
The above steps are shown below.
How to make an instance in an Amazon Web Services(AWS)
How to connect to an instance of Amazon Web Services(AWS)
Once the instance of Amazon Web Services (AWS) is created, it can be accessed by a web browser.
Follow the following steps for connecting the instance to Amazon Web Services.
-
Open the browser and go to the amazon web service and sign in with your credentials.
-
Select the instance, if it is not running then start it by clicking on Action then Start.
-
Once the instance is selected and running then click on Connect.
-
A pop up will appear with the instructions below:
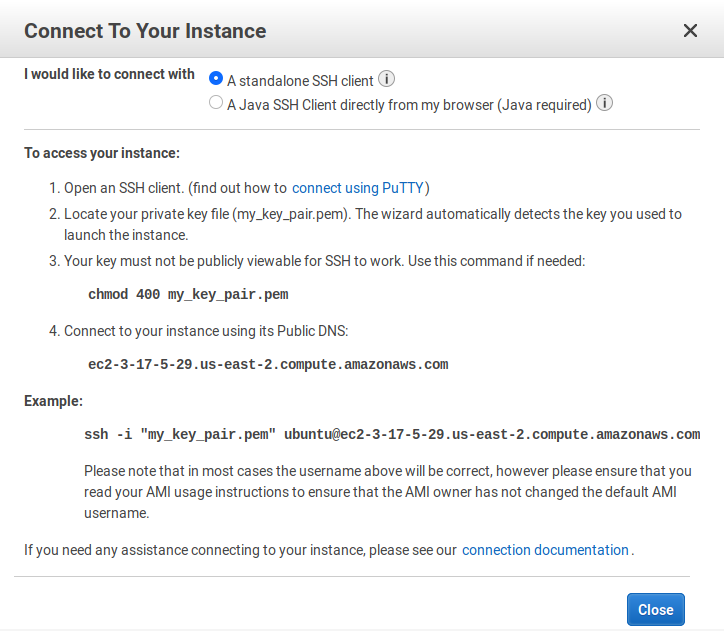
How to connect to your instance of Amazon Web Services (AWS)
-
Select
I would like to connect with A standalone SSH client. -
Open the terminal and go to the directory, where you saved the
my_key_pair.pemkey file and type the following command.chmod 400 my_key_pair.pem -
Connect to the instance with ssh with the following command as explained in the pop-up.
sh -i "my_key_pair.pem" ubuntu@ec2-3-17-5-29.us-east-2.compute.amazonaws.com
The user with the default username ubuntu is connected to the Amazon EC2 instance.
Create a new user and access Amazon EC2 instance in four steps.
The user is connected to the instance of Amazon web services(aws) with the default user ubuntu. Fortunately, Amazon EC2 gives the opportunity to create users like in Ubuntu or in Linux operating system.

Creating and accessing Amazon EC2 instance with a new user in four steps
-
Create a user by the following command.
sudo adduser guestAfter executing the above command, it will ask a password. Once it is given, it creates a user called
guest.A user can also be created without a password, with
sudo adduser guest --disabled-password. -
Access the user by the following command.
sudo su guestIn case, the root user wants to delete a user, it can be done by the following command:
sudo deluser guestUsers in ubuntu are verified by the command
compgen -uandcut -d: -f1 /etc/passwd. -
Make changes in the
ssh_configfile for giving access to theguestuser.-
Open the file
ssh_configusing the commandsudo vi /etc/ssh/sshd_config -
Search for the line
PasswordAuthenticationthen remove the comment and writeyesat the end of it. -
Save the file by
Escape + wq! -
Execute the following commands.
service sshd reload
/etc/init.d/sshd reload
-
-
Access the Amazon EC2 instance with our new user
guestusing ssh.ssh guest@ec2-52-14-200-6.us-east-2.compute.amazonaws.com ssh username@public_dns_nameIt will ask the password of the user, once you enter the right password, it gives access to amazon ec2.
The user can be verified by the command
whoami.
Install Anaconda on Amazon EC2 instance in four steps.
Anaconda®3 is a package manager, an environment manager, a Python/R data science distribution, and a collection of over 1,500+ open source packages. Anaconda is free and easy to install, and it offers free community support.
-
In order to install Anaconda, the user should have superuser rights, else it can be done by adding the user to the sudo group by the following command.
sudo usermod -aG sudo guest -
Use the
sucommand to switch to the new user account.su - guest -
Download the Anaconda 4</sup>distribution of your choice with the following command.
sudo wget https://repo.continuum.io/archive/Anaconda2-5.3.1-Linux-x86_64.shCopy the above command and paste it on your favorite terminal.
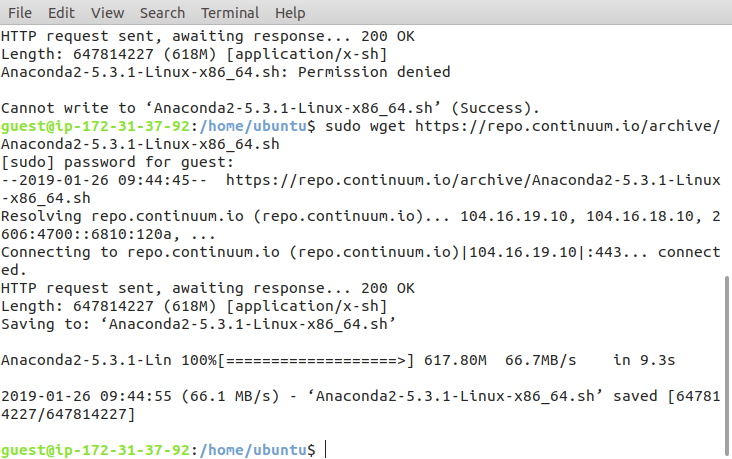
Downloading Anaconda on Amazon AWS instance
-
Now we can run the script
sudo bash Anaconda2-5.3.1-Linux-x86_64.shPress
Enterto continue and again for reading through the license and thenyeswhen asked if you accept the license term as shown below. The installation process will continue, it may take some time. Typeyesagain when asked about the PATH.
Downloading Anaconda on Amazon AWS instance
-
Activate the installation, you should source the
.bashrcfile:source .bashrc
How to run Jupyter notebooks on Amazon EC2 in five steps?
Jupyter5 is a browser-based graphical interface of Ipython shell. It is an open-source web application which allows a user, to create and share documents, which can execute on their systems. If you want to use Jupyter effectively please read here.
Jupyter can be installed on Amazon EC2 in five steps.
1. Connect to your instance.
We chose to connect with user guest. Write the following command on terminal.
```
ssh guest@ec2-52-14-200-6.us-east-2.compute.amazonaws.com
```
2. Set up a SSL certificates
Once we are logged in the instance, we need to create a SSL directory6</sup> at the root of the instance and then enter that directory by cd command as shown below:
mkdir ssl
cd ssl
Now, create a new SSL certificate using OpenSSL:

Creating SSL directory for accessing jupyter on Amazon AWS instance
sudo openssl req -x509 -nodes -days 365 -newkey rsa:1024 -keyout "cert.key" -out "cert.pem" -batch
3. Configure jupyter
Now, generate a new Jupyter config file on the instance of Amazon AWS with the following command:
jupyter notebook --generate-config
In our case, it shows Errno 2 so we will install Jupyter on our instance by the following command:
sudo apt install jupyter
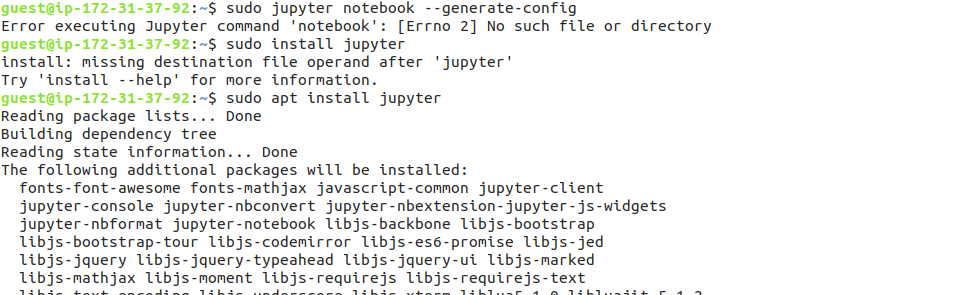
Installing jupyter on Amazon AWS instance
Now, again configure the Jupyter with the following command:
jupyter notebook --generate-config
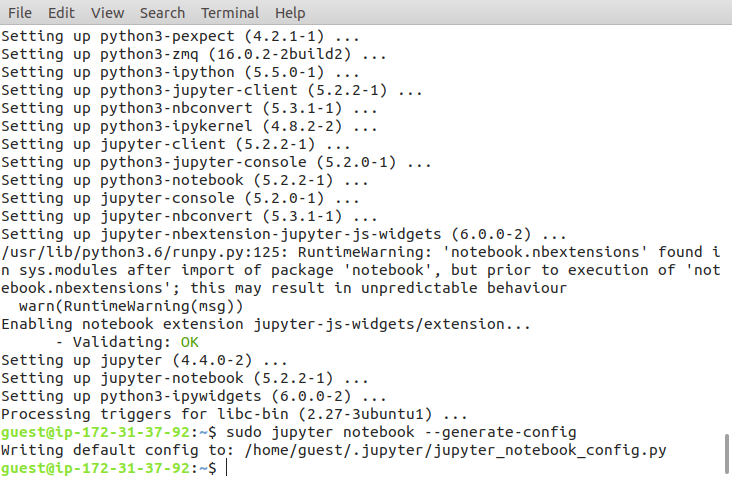
Command for configuring jupyter on Amazon AWS instance
It will be more secure to restrict access to Jupyter via a password because the instance will be accessible from an IP. For generating a password, open an IPython shell by typing ipython on the terminal and run:
from IPython.lib import passwd
passwd()
exit
The passwd() command ask the user to enter and verify a password and create the hash, copy the hash as it will be used in the next step.
Generating password for using Jupyter on Amazon AWS instance
Edit the config file of jupyter notebook by typing the following command:
vim ~/.jupyter/jupyter_notebook_config.py
Insert the following line. We need the hash which we generated in the last step.
Type
ito insert the lines and once you copied the following line, type pressesc + wq!to save and quit.
c = get_config()  # get the config object
c.NotebookApp.certfile = u'/home/ubuntu/ssl/cert.pem' # path to the certificate we generated
c.NotebookApp.keyfile = u'/home/ubuntu/ssl/cert.key' # path to the certificate key we generated
c.IPKernelApp.pylab = 'inline'  # in-line figure when using Matplotlib
c.NotebookApp.ip = '*'  # serve the notebooks locally
c.NotebookApp.open_browser = False  # do not open a browser window by default when using notebooks
c.NotebookApp.password =  'sha1:0b4a2fe67267:904dda5e2caf07b400e4039de87fd89440e3b6b4'  # this is the password hash that we generated earlier.
Configuring jupyter configuration file on Amazon AWS instance
4. Set up local port forwarding
We will be forwarding local port 443 (the HTTPS port) to port 8888 of the remote instance.
Open a terminal in the local machine and type the following command.
sudo ssh -L 443:127.0.0.1:8888 guest@ec2-52-14-200-6.us-east-2.compute.amazonaws.com
Enter the password correctly for connecting to the instance.
Setting up forwarding local port(443) to the port (8888) of Amazon AWS instance
5. Use Jupyter from a local browser
On the Amazon instance, create a folder for saving all the notebooks.
mkdir notebooks
cd notebooks
Now, start the Jupyter notebook by running the command on the Amazon instance:
jupyter notebook
Copy the address http://localhost:8888/?token=df2abf94cba1e7016e7940e52e35df08b539ba438e07a08a which is shown on the terminal of the Amazon AWS instance.
Now, open a local browser and paste the address which we copied above. We are able to access jupyter which is running on Amazon AWS instance from our local machine.
Accessing jupyter running on Amazon AWS instance, from our local machine
In short, the Jupyter is running on the Amazon AWS instance and we are accessing it from our local machine.
Conclusion:
In this post, you learned about Amazon Web Services and explored about the its free tier services. You created and accessed an instance and also created a user on it. You also installed important software which are necessary for data science. For being an effective data scientist or software engineer, it is very important to know how to find information about unknown problems either by webs search or by reading books. It is better to focus more on how to find the solutions, rather than memorizing the tools or the commands.
I hope, this helps and motivates you to explore more about Amazon Web Services for doing complicated and analysis on huge data set in a short span of time.
References and further reading list
1: https://aws.amazon.com/what-is-aws/
2: https://docs.aws.amazon.com/AWSEC2/latest/UserGuide/concepts.html
3: http://docs.continuum.io/
4: https://repo.continuum.io/archive/Anaconda2-5.3.1-Linux-x86_64.sh
5: https://jupyter.org/
6: https://blog.keras.io/running-jupyter-notebooks-on-gpu-on-aws-a-starter-guide.html
Leave a comment